Don’t let your old content get stale, keep it fresh! Similar to Auto-Poster, Social Snap can automatically share old posts and content you want to boost! You can pick what content you want to be revived. It’s a great way to leverage all of your existing content and reach new visitors.
- Installation & Setup
- Connecting Social Networks
- General Settings
- Individual Post Settings
- Activity Log
- Troubleshooting
Installation
Boost Old Posts Addon installation method is described in our How to Install Social Snap Addons tutorial.
Setup and configuration
When the addon is installed and activated, visit Social Snap » Settings » Boost Old Posts to continue the setup.
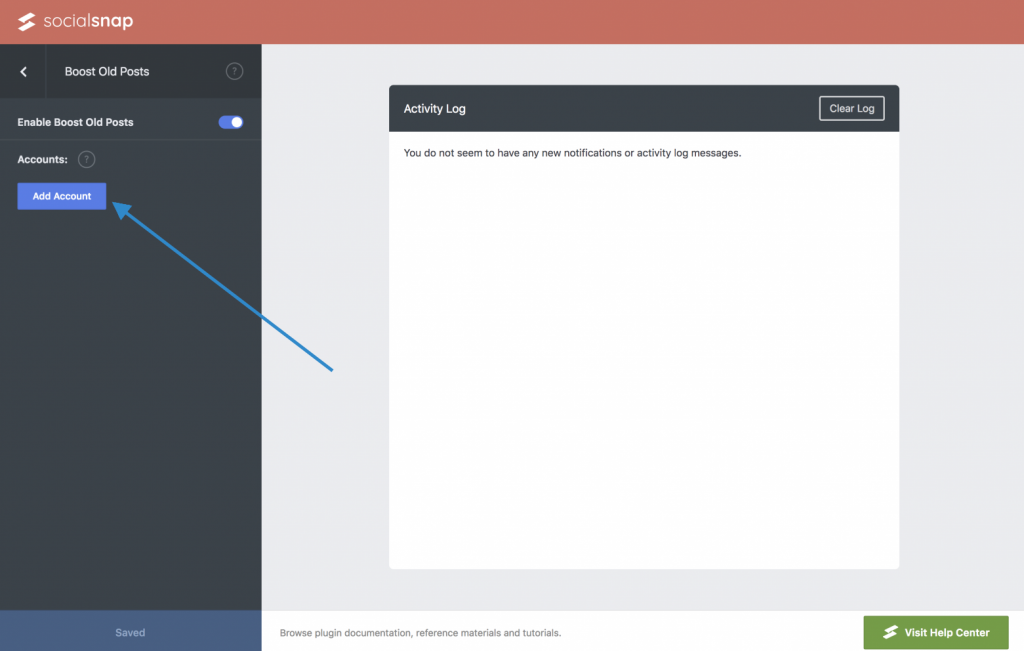
Initially (or in case you do not have any accounts connected), you will be asked to connect at least one social account before other options are displayed. Click Add Account and a popup will appear asking you to choose which network provider you’d like to connect.
Connecting Social Networks
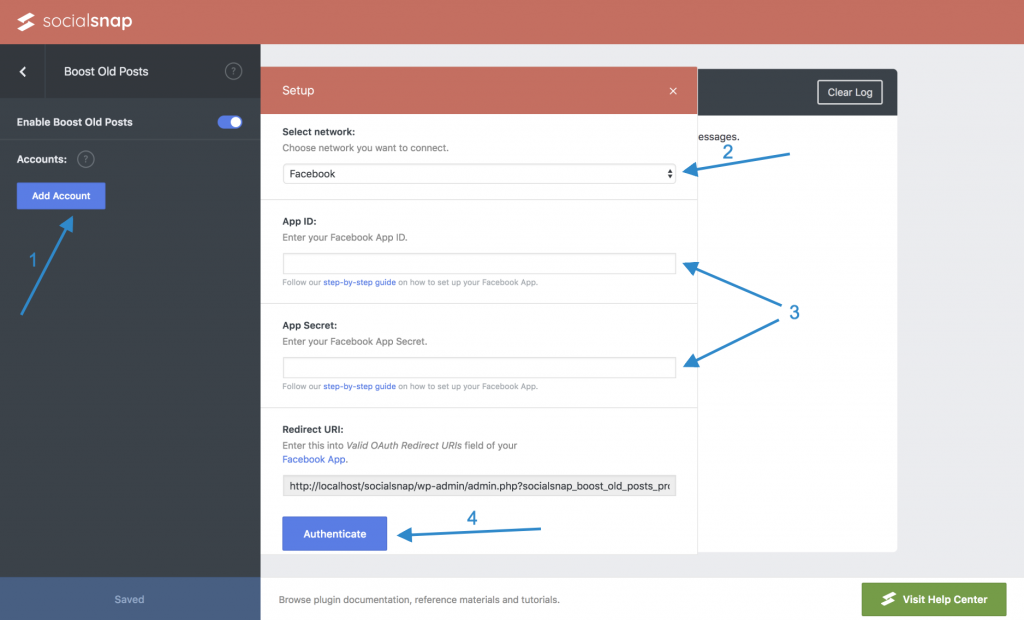
You can connect Boost Old Posts Addon to Twitter, LinkedIn and Facebook. Please follow our step-by-step guides to set up an app for your social network if you don’t already have one. This will give you API credentials to enter into the Boost Old Posts settings page to connect to the selected social network.
Step-by-step Guides: How to Setup Twitter App, How to Setup LinkedIn App, How to Setup Facebook App.
Once the required information is there, click the Authenticate button and authorize the connection. This will allow your App to post entries to your profile or page.
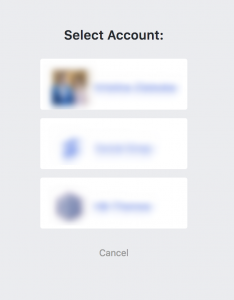
In case you are admin or you manage LinkedIn companies or Facebook pages, after you authorize the connection you will see a pop-up where you can choose one of the accounts. You can add several accounts by repeating the process from the beginning and choosing a different account.
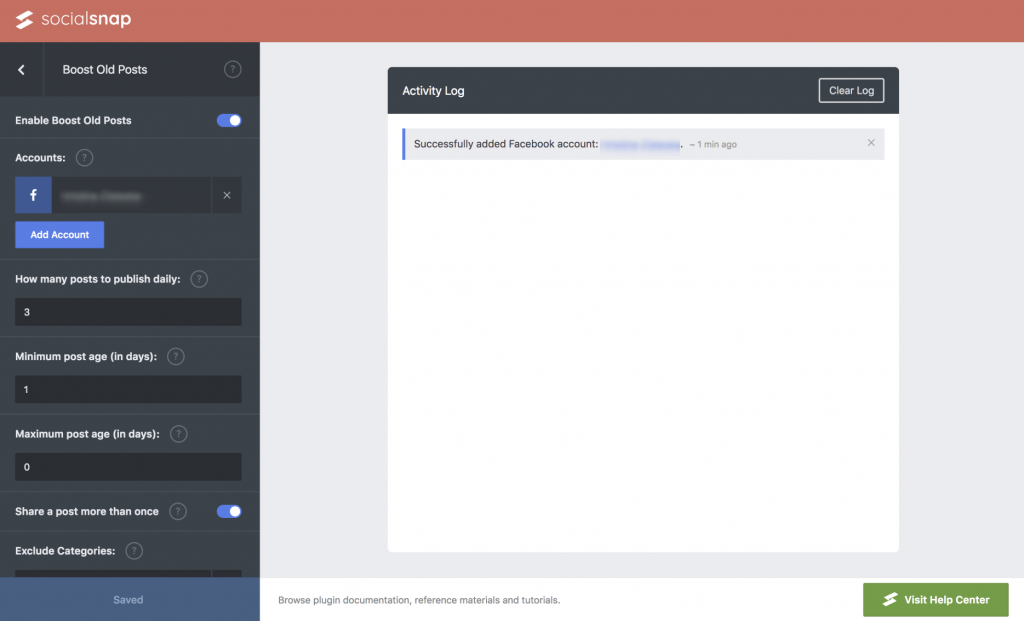
When at least one account is connected, other options should appear on the Boost Old Posts settings page.
General Settings
These settings allow you to set general rules and default settings for all shareable content. Default settings can be overruled per entry, such as post content, hashtags, additional text before and after.
- How many posts to publish daily: Maximum number of posts to be publish during a 24 hour period. Posts will be published in even intervals depending on the number.
- Minimum post age (in days): Post must be older than 1 day.
- Maximum post age (in days): Insert 0 if you want unlimited age.
- Share a post more than once: Allow posts to be shared multiple times.
- Exclude categories: Don’t post an entry from these categories. Custom taxonomies are included.
- Share Post Types: Which post types you want to share.
- Post Content: Set default format of the content.
- Post Hashtags: Set default hashtags of the content.
- Additional text (before): Add text to the beginning of the generated post.
- Additional text (after): Add text to the end of the generated post.
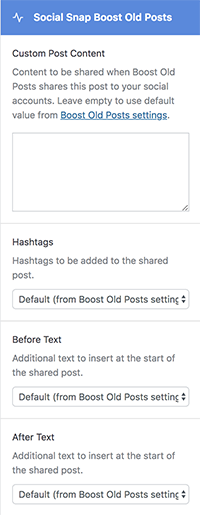
Individual Post Settings
For every selected post type in General Settings, additional set of options should appear in the Social Snap Options Metabox when you’re editing the page. If the fields remain unaltered, the post will use default settings set in Social Snap » Settings » Boost Old Posts.

Gutenberg users can find the settings under Extended Settings » Social Snap Boost Old Posts.
Activity Log
The activity log is located in the Live Preview section of the Social Snap » Settings » Boost Old Posts settings page. It displays all activities by Boost Old Posts Addon. You can see the publishing history and statuses of previously shared posts. The activity log is useful to keep track which posts were shared. If any problem occurred, error details will be displayed in the activity log.

Troubleshooting
Having trouble? Follow these steps to make sure everything is setup correctly before posting a support request:
- Check that your App / Client IDs or keys are correct
- Check the Activity Log for any error messages
- Submit a support ticket so we can troubleshoot further

Was this article helpful?
2 out of 3 found this helpfulWe're always happy to help with any questions you might have!
Open a support ticket and our team will reply with a solution.
Copyright © 2025 Social Snap, LLC. All Rights Reserved.